Live Captions, ASL Interpretation, and Translated Captions
Meeting attendees or the host can turn on live, automated transcription of a meeting.
On this page:
Enable live captions (host)
- Start your meeting
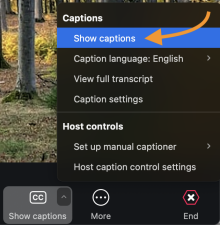
- Find the Show Captions button
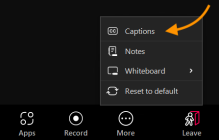
- It may be under the More menu
- Choose Show Captions
- Set the caption language, the primary language spoken during the meeting
- The default is English
- Click Save
- The captions will begin and show on the bottom of your Zoom window. Attendees will be able to click Show Captions to see them
Enable live captions (Attendee)
- Join a meeting
- Find the Show Captions button
- Go to More > Captions if you don’t see the Show Captions button
- Click the Show Captions button
- Set the caption language, the primary language spoken during the meeting
- The default is English
- Click Save
- The captions will begin and show on the bottom of your Zoom window. Other attendees and the host will also be able to see the captions if desired.
Viewing captions in a meeting
Meeting attendees will see the captions/transcript right away or they will be prompted that captions are available. Attendees have two choices to view the transcription:
- Show/Hide Captions: places the subtitles in a box over the meeting window. This box can be moved around the meeting window.
- View Full Transcript: opens a transcript panel on the right side of the meeting window. This view gives the name of the speaker (as near as Zoom can tell), and it allows anyone on the meeting to save the transcript.
Sign Language Interpretation
Zoom gives you the ability to assign up to 20 people as sign language interpreters in a meeting or webinar. Video of sign language interpreters can be resized and relocated by attendees.
For more details see Enabling sign language interpretation and Viewing sign language interpretation on the Zoom support site.
Translated Captions
UB has several licenses available for loan that allow a host to turn on automatic, translated captions for their meetings. Enabling translated captions can help English language learners in Zoom by showing them captions in their own language based on the English spoken during a meeting.
For more details see Enable/disable translated captions on the Zoom support site.
Zoom app and profile settings
Live captioning is enabled by default in your Zoom profile settings.
- Go to the UB Zoom portal
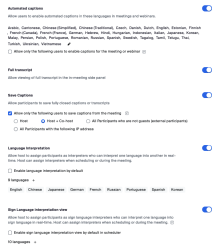
- Settings > In Meeting (Advanced) > Closed Captions
- Enable/disable and choose options for the following settings:
- Automated captions
- Full transcript
- Save Captions
- Language interpretation
- Sign language interpretation view
Common questions
Can you have live transcription start automatically when your meeting starts?
Transcription cannot be started automatically, but the host or any participant can start a live transcription. See Viewing captions in a meeting or webinar.
Who can save live transcripts?
By default, live captions and transcripts can be saved by anyone in the meeting. Change your profile settings to turn off the ability to save captions and transcripts:
- Go to Settings > Meeting > In Meeting (Advanced) > Save Captions
Turning off Save Captions will keep you, the host, from saving your own captions or transcripts. Check Allow only the following users to save captions from the meeting to select which attendee types can save captions, including the host, co-hosts, and internal participants.
See also
Need help? Contact the UBIT Help Center or your departmental IT support.


