Building partnerships through collaboration.
Use Sort Column Feature
The Sort Column featrure allows you to organize and rearrange your data in a specific order.
Steps
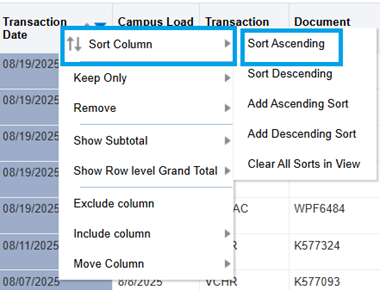
To sort data, right-click on a column header and select Sort Column (Figure 1).
- Sort Ascending — Enables you to sort the values in the column by ascending order, as a first-level sort. For example, string values sort alphabetically A through Z, or numbers sort lowest to highest.
- Sort Descending — Enables you to sort the values in the column by descending order, as a first-level sort.
- Add Ascending Sort — Specifies that an ascending sort for this column is added as another sort for the analysis.
- Add Descending Sort — Specifies that a descending sort for this column is added as another sort for the analysis.
Clear All Sorts in View — Removes all sort specifications that you have made.

Alternatively, for quick sorting, hover to the right of the column name and click the upward or downward-facing triangle icon in the header to sort the column in ascending or descending order. (Figure 2).

You can also add secondary and tertiary sorting levels by clicking additional column headers and repeating the same steps using Add Ascending Sort or Add Descending Sort.
As an example, looking at the Financial Dashboard –> State Funds –> State – Non – Personal Service dashboard, the default view under the State Non-Personal Service Transactions section is as follows (Figure 3): (Note: you can further refine the results by adding either transaction dates or campus load date ranges.)

If we want to view the data in ascending order of transaction date, right click on the Transaction Date column, and select Sort Ascending (Figure 4) or click on the upward facing arrow next to the words Sort Column (Figure 5).

The resulting view will look like this with the oldest date shown first (Figure 6).

If you want to further sort the data, you can use Add Ascending Sort or Add Descending Sort on any column (Figure 7).

When a column is sorted, you'll see both an upward-facing and downward-facing caret (^) next to the column name. The blue caret indicates the active sort direction (Figure 8).
- Upward-facing (^) = Ascending order
- Downward-facing (v) = Descending order
