Building partnerships through collaboration.
Use Prompts and Sections
Prompts and sections make it easier to organize and view large datasets by grouping information, such as account numbers, without filtering one value at a time.
When reviewing larger sets of data, the Move Column To Prompts and To Sections options can be very useful tools to help sort and easily view data.
For columns that have many lines of data, Account Number for example, moving the column to a prompt or section can allow the user to group and view data by an individual value in that field without having to filter one value at a time.
A word of caution: When a field has many unique values/results and only a few lines of data associated with it, moving a column to prompts or sections is not as useful of a tool because you will have to switch or scroll more to view the data. If there are too many unique values using the prompt or section options could cause an error in the report. If this occurs, reset the page to the default display.
For example, using the Financial Dashboard – State Funds page, the default dashboard appears as in Figure 1 .
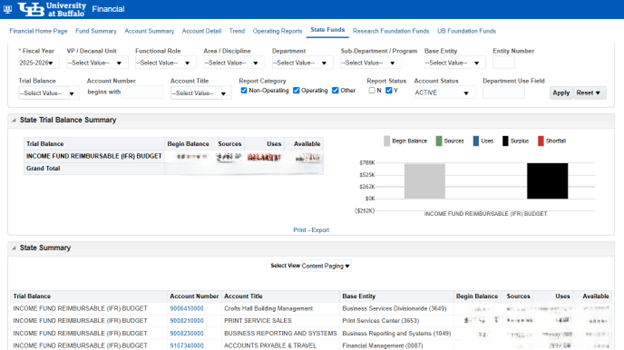
Note in this example that several account numbers appear in the column. Moving Account Number To Prompts allows you to quickly toggle between account numbers and see all data associated with an individual account number in the prompted field (Figure 2).

Moving to Sections allows the user to continue to view all data at once and on one page but organizes by the sectioned field into separate tables.
Using Account Number as the example, moving Account Number to Section results in the following view (Figure 3).

As seen above, the rows show the same data as before, but are now grouped by Account Number, and totals by Account Number are easily identifiable.
How to Move Column to Prompts or Sections
There are two ways to do this:
1. Click – hold – drag by the column Heading. This is similar to moving columns to the left or right. Left click when the column heading has a small bar across the top and your cursor changes to a double arrowed cross.
Drag column to the white space above the Table. This area can be sensitive and can easily miss the correct area to drop the column into. As you drag your mouse, you will see the bar pop up, and as you use it more often, the user will be able to better place the column.
- To place into a prompt, drag the column slightly higher in the white space, You will know you are in the correct place when the small “Prompt” bar appears.
- To place into section drag the column slightly lower in the white space. You will know you are in the correct place when the small “Sections” bar appears (Figure 4).

Release your mouse to put the column into prompts or sections
2. Right-click on the column heading and select ‘Move Column’ from the drop-down. Right-click on the column heading to open the drop-down menu
Hover over ‘Move Column’ to show the drop-down list of options and left-click on where you would like to move your column to (Figure 5).

- Click To Prompts to create a prompt at the top of the report
- Click To Sections to create separate reports of the column