Add or Delete an Authorized Payer
Add or delete an authorized payer such as a parent or guardian.
How to Add or Delete an Authorized Payer
1. Go to Billing/Payments
Log in to your HUB Student Center through MyUB. Click Billing/Payments (Figure 1).
2. Click Payment Options
Click Payment Options in the navigation menu (Figure 2).
3. Click Authorize Payers
You are brought to the QuikPAY homepage. Click Authorize Payers in the navigation menu (Figure 3).
4. Click Add New
To add an authorized payer, click Add New (Figure 4).
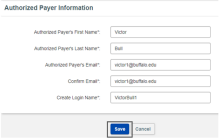
5. Enter Authorized Payer Information
Enter the authorized payer's name, email, login name and click Save (Figure 5).
6. View Confirmation Message
You will see a message that confirms the authorized payer has been created (Figure 6).
7. Delete Authorized Payer
To delete an authorized payer, click the X next to the authorized payer's name (Figure 7).
A warning message will appear. Click OK (Figure 8).
You will see a message that confirms the authorized payer has been deleted (Figure 9).
Need Assistance?
Contact the Student Accounts office by phone at 716-645-1800, or submit your question using our online form.


