Building partnerships through collaboration.
Create a Receiver
After your order has been received, you have to create and submit a receiver in ShopBlue to indicate that the items have been received.
On this page:
When a Receiver is Required
A receiver is required for all ShopBlue transactions when a product or service is received, regardless of the transaction amount, with the exception of Payment Requests. Without a receiver, the supplier will not receive their payment. Enter receivers as soon as possible upon satisfactory receipt of goods or services. If a receiver cannot be entered, please comment within ShopBlue to provide the reason and details. Failure to complete a receiver in a timely manner will result in escalation to your Unit Business Officer.
When creating a receiver in ShopBlue, the Receiver Date will default to today’s date. Be sure to change the date to the actual date you received the item or services. A receiver can only be completed from the purchase order, not the voucher.
You can set up receiver notifications in your profile to be notified when a receiver needs to be created after your purchase order completes. For more information on notifications, review the Set Up Receiver Notifications instructions.
Types of Receivers
Cost Receiver
- Used for Standing Orders and Service Request Forms.
- The receiver should be done based on the dollar amount that has been received or invoiced.
- The system will not allow a quantity receiver for orders that require a cost receiver.
Quantity Receiver
- Used for the majority of all orders based on the quantity of items or services received.
- The system will not allow a cost receiver for orders that require a quantity receiver.
How to Create a Cost Receiver
Create a Cost Receiver [2:25]
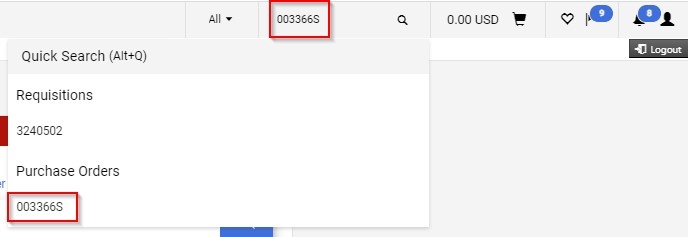
1. Locate and Search Purchase Order Number
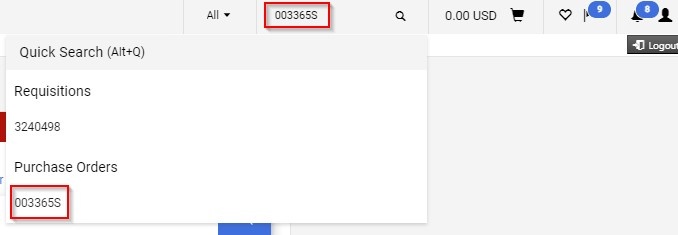
When item(s) or service(s) have been received for a standing order or service request form, locate the Purchase Order number. Type the PO number into the search bar in the top right-hand corner of the Shopping homepage and press Enter (make sure the dropdown is set to PO or All). Click on the purchase order from the dropdown menu (Figure 1).
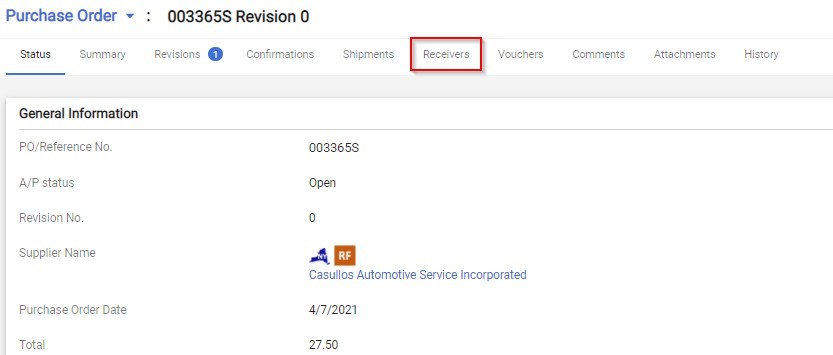
2. Select Receivers Tab
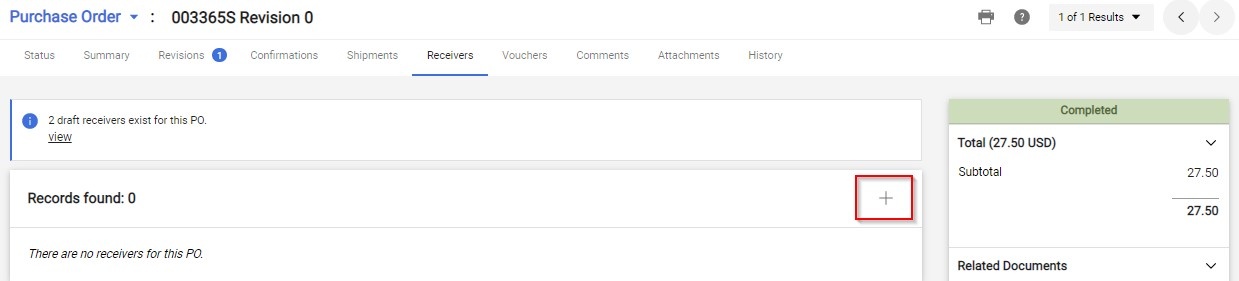
On the Purchase Order page, select the Receivers tab (Figure 2).
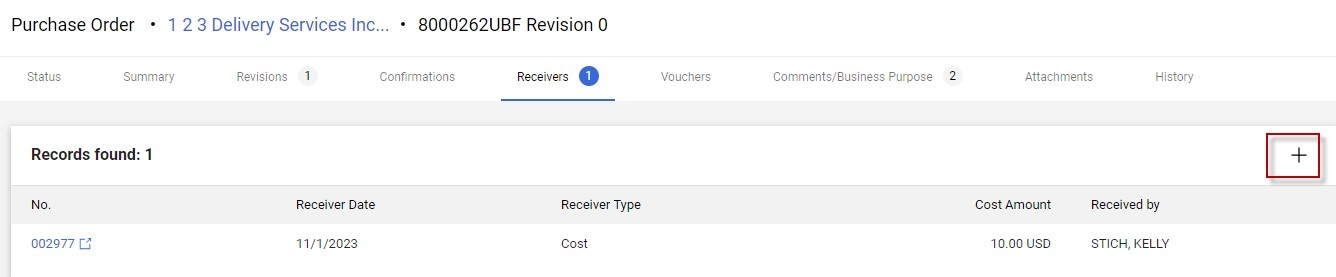
3. Create Cost Receiver
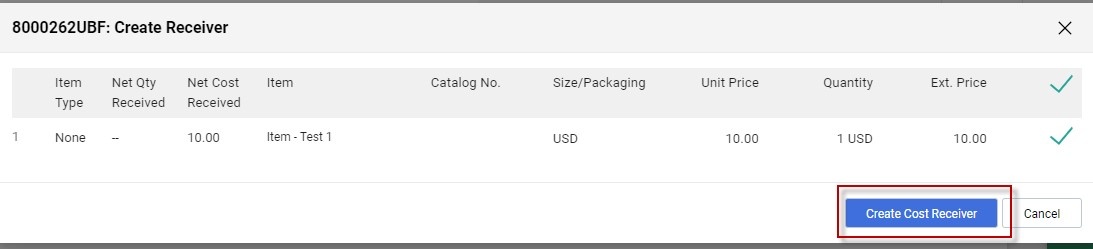
On the Receivers tab, you will see all of the receivers that have previously been created for that PO. To enter a new receiver, select the plus (+) sign (Figure 3). A popup will then open, with all purchase order lines automatically selected. Remove the check for items that you have not received. Then you will select Create Cost Receiver (Figure 4).
4. Edit Receiver Date
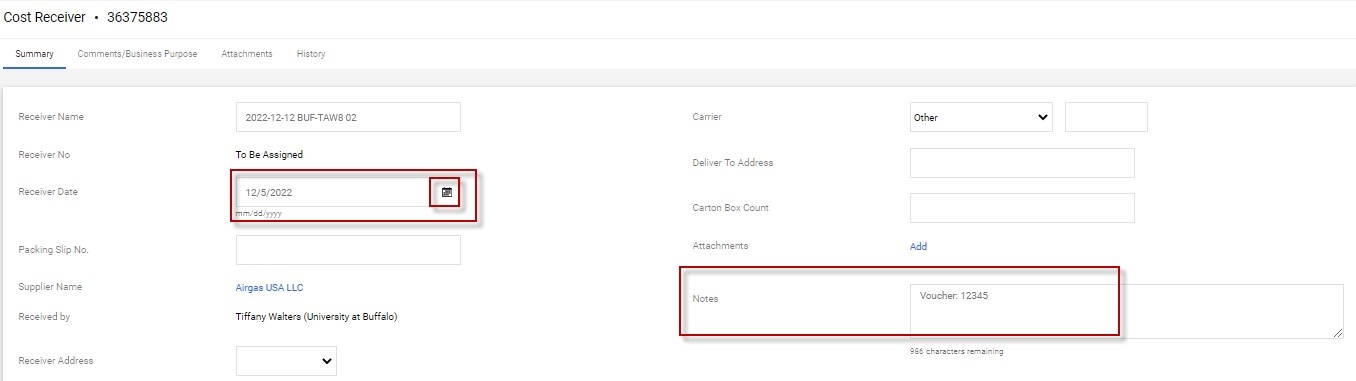
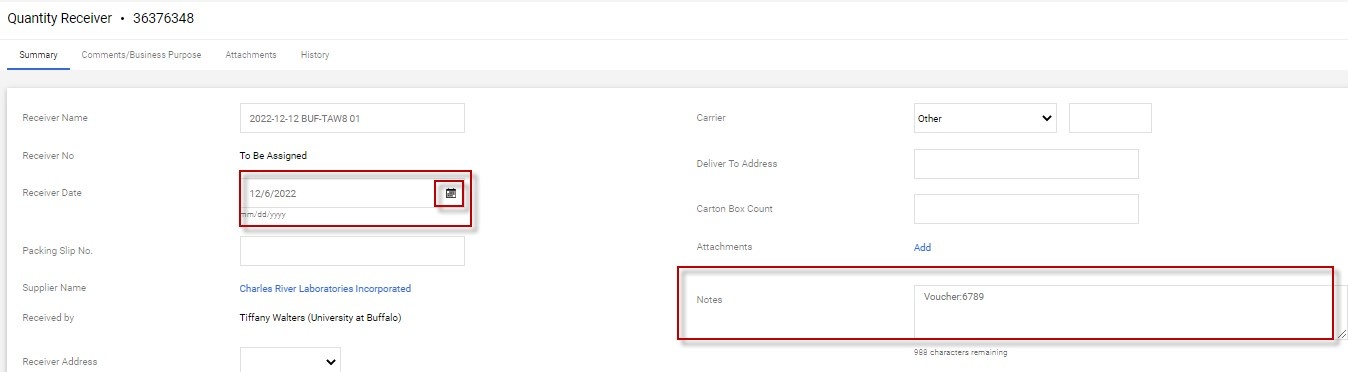
You are now creating a Cost Receiver. The Receiver Date will default to the date you are creating the receiver; be sure to change it to the date the item or service was actually received by clicking the Calendar icon. If there is a corresponding voucher, please add the voucher number to the Notes section (this is not required if no voucher has been created yet) (Figure 5).
5. Update Cost Received and Complete
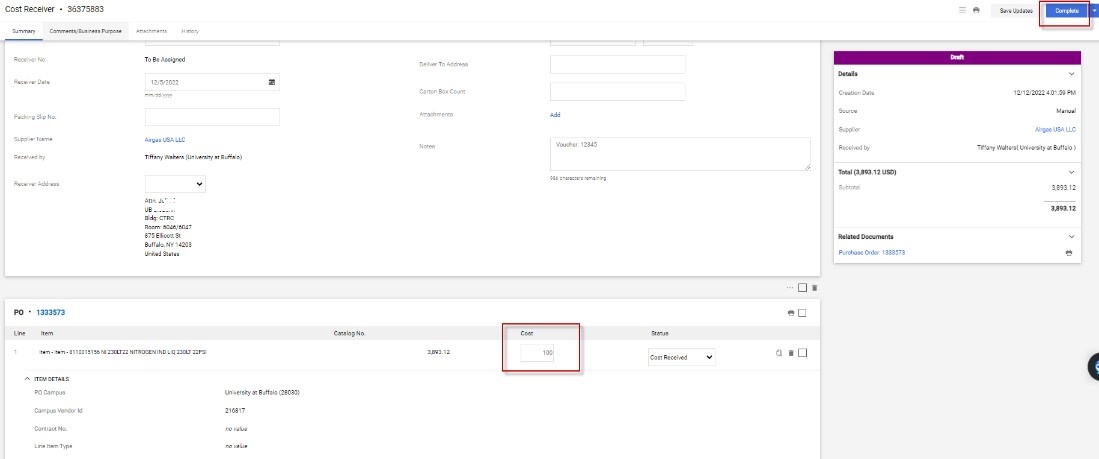
Please note that the full amount of the total of the PO is defaulted as the cost. In the cost field, update the dollar amount to the amount you are receiving (or the amount being invoiced). Then select Complete (Figure 6).
6. View Confirmation and Completed Receiver
After selecting Complete, you will receive a confirmation screen (Figure 7). The receiver you just completed now has a number associated with it and you can click to view it.

7. Repeat Steps to Create Additional Cost Receivers
Repeat these steps as needed to create additional cost receivers for the PO.
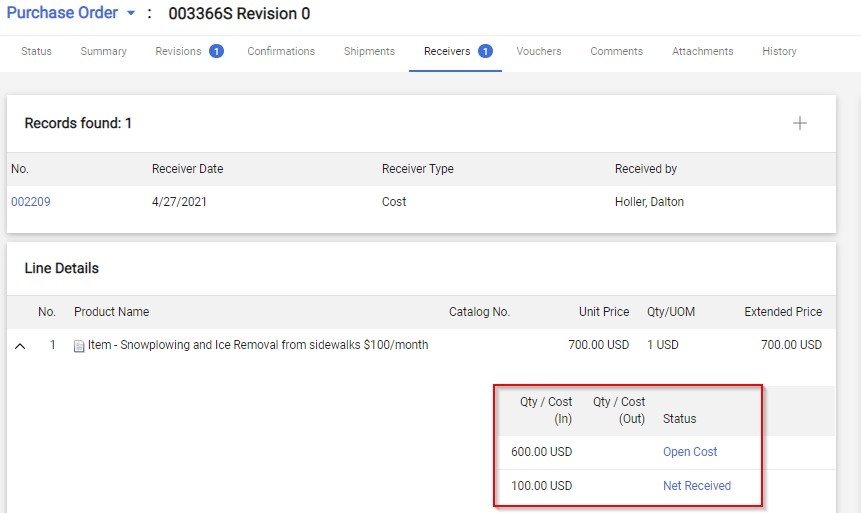
Note: In the purchase order, click the Receivers tab at the top to access a summary of the receivers created, the dollar amount you have received (net received), and the balance on the PO (Open Cost) (Figure 8).
How to Create a Quantity Receiver
Create a Quantity Receiver [2:44]
1. Locate and Search Purchase Order Number
When item(s) or service(s) have been received, locate the Purchase Order number. Type the PO number into the search bar in the top right-hand corner of the Shopping Homepage and press enter (make sure the dropdown is set to PO or All). Click on the purchase order from the dropdown menu (Figure 9).
2. Select Receivers Tab
On the Purchase Order page, select the Receivers tab at the top (Figure 10).

3. Create Quantity Receiver
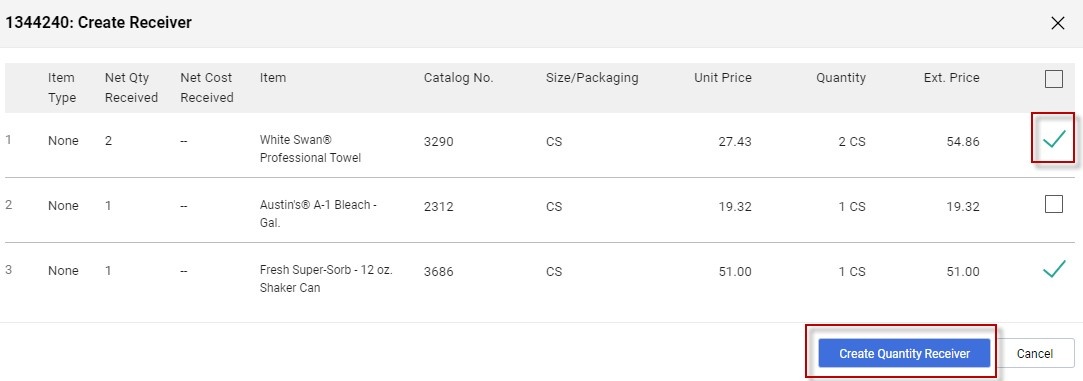
On the Receivers tab, you will see all of the receivers that have previously been created for that PO. To enter a new quantity receiver, select the plus (+) sign (Figure 11). A popup will then open, with all purchase order lines automatically selected. Remove the check for items that you have not received. Then you will select Create Quantity Receiver (Figure 12).
4. Edit Receiver Date
You are now creating a quantity receiver. The Receiver Date will default to the date you are creating the receiver; be sure to change it to the date the item or service was actually received by clicking the Calendar icon. If there is a corresponding voucher, please add the voucher number to the Notes section (this is not required if no voucher has been created yet) (Figure 13).
5. Enter Quantity Received and Complete
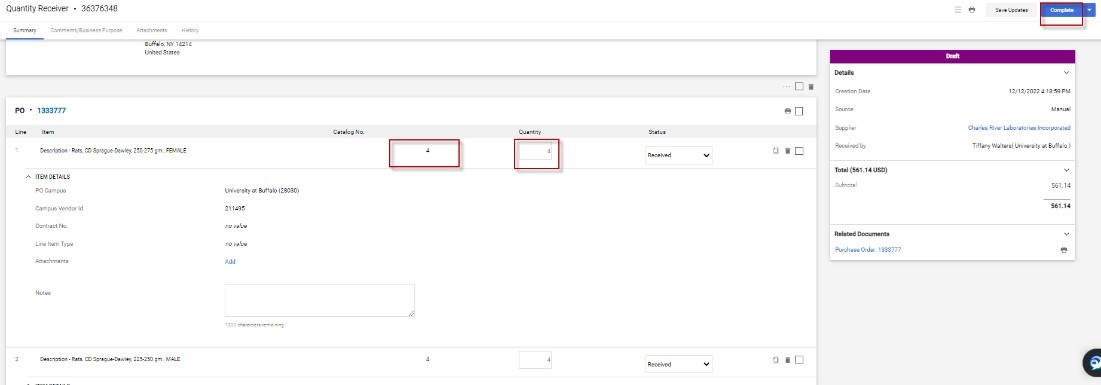
Please note the quantity will default to the total quantity of the item(s) or service(s) listed on the PO. If you have received your entire order, click Complete and you are finished (Figure 14).
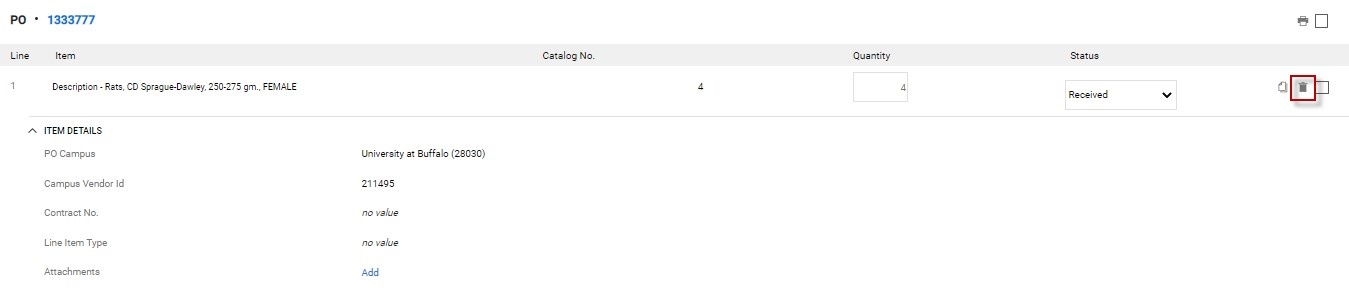
6. If Needed, Remove Lines That Have Not Been Received
If you have not received all the item(s) or service(s) on your PO, select the Trash Can icon for the line item(s) or service(s) you have not received (Figure 15). This will remove that line from the receiver. The removed lines will disappear from the screen to be received at a later date. After that, enter the quantity for the lines you have received and select Complete.
7. Repeat Steps to Create Additional Quantity Receivers for PO
When you have received the rest of your items, follow the steps above to create an additional receiver. The items you have already received will have a “0” in the quantity field with a corresponding receiver number in the Previous Receivers field. Enter the quantity of the items you have now received and select Complete.
Note: Once a receiver has been submitted, it is matched to the Purchase Order and Invoice. If match is successful, payment will be initiated. If unsuccessful, Accounts Payable will reconcile any discrepancies.
Need help or have questions?
Visit our Business Services Support Hub to submit and track requests and access helpful resources.