


Scheduling Appointments


Use Navigate to schedule appointments with a range of support offices you may need throughout your time at UB. Whether you're seeking academic advising, tutoring, success coaching, financial wellness support, or help connecting to campus resources, you can book directly through the platform. Navigate is customized to your UB experience: simply login, choose the type of service you're looking for, and select an available time that works for you.
Important!
To provide students with accurate information and needed assistance, designated university staff and faculty have access to Navigate. Students should use caution when sharing sensitive, personal information, particularly via email.
Drop-ins
If you don’t see available appointment times, staff are still ready to help. Many offices offer in-person or virtual drop-ins without an appointment, especially during busy times like drop/add week.
Drop-in availability varies by office and may change throughout the semester.
Virtually Dropping-In
Video Demo
Watch our brief video demonstration (linked) of how to virtually drop in for advising (UBIT name and password required).
1. From the home page, click the Appointments icon. Press the blue "Schedule an Appointment" button.
2. In the Other Appointment Options area, select "View Drop-In Times".

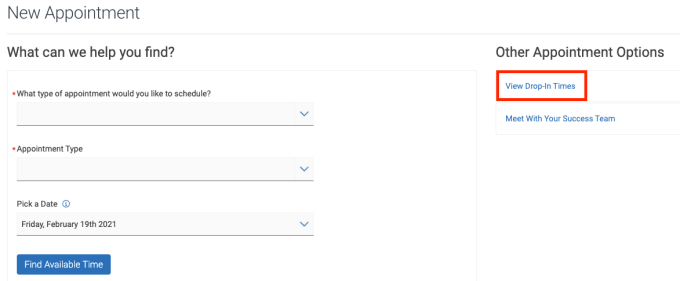
3. Choose the type of appointment you wish to drop in for (e.g. advising, student support, etc.). Then, choose “drop-in advising” from the Appointment Type drop-down menu. The scheduler will ask you relevant questions to determine the most appropriate office/staff member. Select the option(s) that applies and click “Continue to Next Step.”
4. Press the “Find Available Time” button.
5. After selecting the date from the calendar, select the location you are seeking assistance from. In the Available Drop-In Times page, click the “Drop-In Online” button below the name of the advisor with whom you prefer to meet or select “Check-in with first available” if this function is available at the location.
6. You have now been added to the advisors’ queue.
7. Be prepared to receive a follow up communication via email, phone or text with your next steps. An advisor will be in contact with you as soon as possible in the order in which students dropped in (wait times vary and can be up to 15-20 minutes).
8. If you can no longer wait and need to return later for drop-in assistance, please ensure you check yourself out.
Removing Yourself from the Advising Queue
If you wish to remove yourself from the drop-in queue:
- go to the Navigate app or desktop version,
- click the Appointments icon,
- select the "Active" tab at the top, and
- press the "View Details" arrow on the Drop-in Advising session
- press the blue "check-out" button.
How to Make an Appointment
Navigate offers a variety of ways to schedule appointments with various staff across campus; we outline 3 popular options of scheduling appointments below. Use these instructions to make appointments through the Navigate app or desktop version.
1. From the home page of EAB Navigate, select the Appointments icon. This will take you to a screen titled "My Appointments," with tabs at the top for your upcoming as well as your past appointments.
- Scroll to the bottom of the page and select "Schedule an Appointment", where you'll see two scheduling workflow options.
Option 1: Filling in the Drop-Down Menus
- Choose your appointment type. Select the service you need (e.g., advising, tutoring, student support). Options shown are based on your program and available campus services.

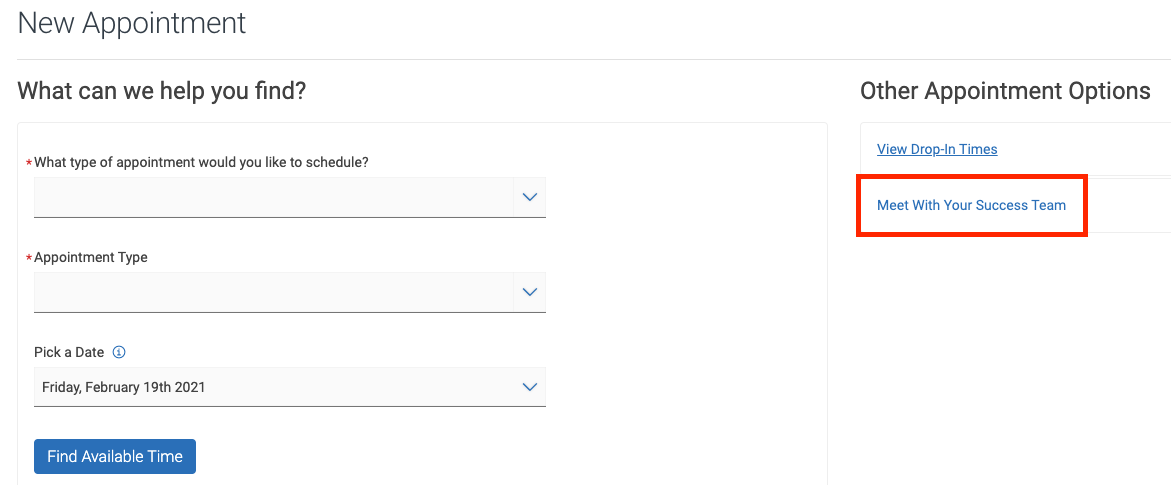
Option 2: Scheduling Directly with Your Success Team
- From the appointment scheduling page, “Meet With Your Success Team” under the Other Appointment Options. You'll see a list of your assigned advisors, success coaches, peer mentors, and other support staff. Select the person you'd like to meet with. If they offer multiple services, choose the appropriate option.
2. Select your date and time using the "Find Available Time" button. Use the calendar to view available appointments over the next 30 days. Dates with available appointments will have a dot underneath them in the date picker calendar.
3. There are optional filters displayed beneath the date picker calendar. You may select a preferred location, staff member, or meeting format (in person, phone, or virtual), depending on what each office offers.
- An option of Course selection is available if your appointment reason is tied to a course or if you need tutoring.
4. Choose the day and time you would like to meet. The Review Appointment Details page will open:
- Check the appointment details, select how you'd like to meet (if prompted), and add your phone number and any notes.
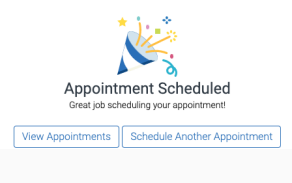
- You will receive an appointment notification email immediately after scheduling your appointment, as well as text message and/or email reminders the day of your scheduled appointment.

5. You can cancel appointments if needed.
- Please be mindful that departments determine how far in advance you can cancel appointments. Check with them about their process and review how to cancel an appointment, outlined below.
Appointment Invitations
You may be invited by a UB staff member to make an appointment for a specific reason. In this case, you will receive both an email with a scheduling link from the staff member and a notification in EAB Navigate inviting you to schedule the appointment. This invitation will show up as a yellow banner listed below.


How to Cancel an Appointment
1. From the home page, select the Appointments icon. Select the upcoming appointment you wish to cancel. You will then see your appointment details on the next screen, where you should select “Cancel Appointment.”

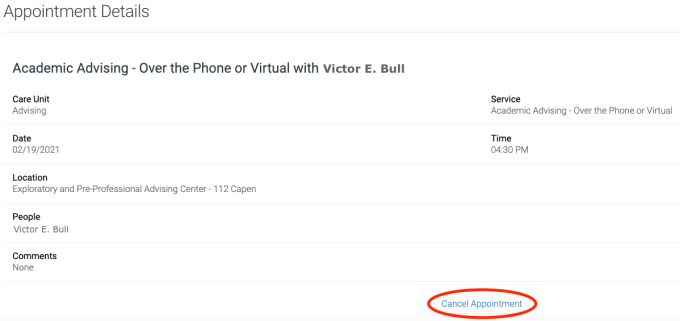
2. Select a reason for canceling from the drop-down menu. This is required. You can also add an optional comment to your staff member. Click the blue button labeled “Cancel Appointment” at the bottom of the screen.
3. Then confirm that you have canceled the appointment. You may reschedule the appointment by selecting the button labeled "Schedule Another Appointment."
· You will receive an email confirming the appointment has been cancelled.