University at Buffalo (UB)
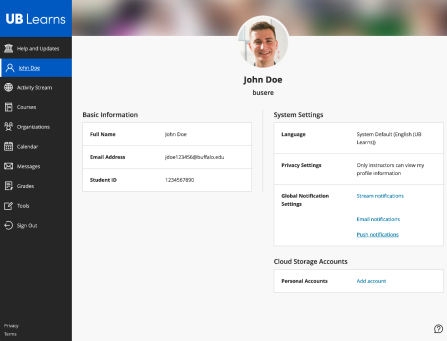
Profile
Add a profile picture; change language, privacy and notification settings; and link your cloud storage accounts to UB Learns.
Your name will appear in the Ultra Base Navigation menu instead of the word Profile.
On this page:
Overview

- Add a picture to your profile.
- Set your notification preferences for activity stream, email and push notifications.
- You can also set your preferences on the Activity Stream page.
- Push notifications only apply to Blackboard mobile apps.
- Link your cloud storage accounts to UB Learns.
Adding a Profile Picture
- Move your cursor over the generic profile icon and click the pencil icon. A new drawer slides out from the right.
- Click Upload new profile picture.
- Locate a picture on your computer.
- Click Choose.
- Click on the blue square with the X in it to close the drawer.
Removing a Profile Picture
- Move your cursor over your profile picture and click the pencil icon. A new drawer slides out from the right.
- Click the trash can icon.
- Click Delete.
- Click on the blue square with the X in it to close the drawer.
Changing Language Settings
By default, the language is set to System Default (English – UB Learns).
- Move your cursor over the Language section in the Systems Settings and click the pencil icon. A new drawer slides out from the right.
- Select a new language from the Default Language drop-down menu.
- Click Save.
Changing Privacy Settings
- Move your cursor over the Privacy Settings section in Systems Settings and click the pencil icon. A new drawer slides out from the right.
- Select one of the privacy options.
- Click Save.
Changing Stream Notification Settings
You can also change notification settings on the Activity Stream page.
- Click on the Stream notifications link in the Global Notification Settings section. A new drawer slides out from the right.
- Choose which notifications you would like to appear on the Activity Stream page. Options include:
- Institution announcements.
- Course and organization announcements.
- Graded items due.
- Graded item due soon.
- Graded item past due.
- New content.
- Assessment added.
- Content added.
- Grades posted.
- New discussion.
- My grades and activity.
- No recent activity.
- Grade low or at risk.
- Grade dropped.
- Low course activity.
- Grade increased.
- Course activity up 10%.
- Grade in top 10%.
- New calendar event.
- New course or organization.
- Blog activities (entry posted, entry edited).
- Journal activities (entry posted, entry edited).
- Wiki activities (page created, page edited, comment posted.
- Click Save.
Changing Email Notification Settings
You can also change notification settings on the Activity Stream page.
- Click on the Email notifications link in the Global Notification Settings section. A new drawer slides out from the right.
- Choose the frequency of the notifications:
- Email me right away.
- Email me once a day.
- Select the items to include in the notification email:
- New grades and feedback.
- New messages.
- New discussion messages.
- New content added.
- New and upcoming due dates.
- Past due items.
- New courses available.
- Click Save.
Changing Push Notification Settings
Push notifications require the installation of the Blackboard mobile app on your mobile device.
You can also change notification settings on the Activity Stream page.
- Click on the Push notifications link in the Global Notification Settings section. A new drawer slides out from the right.
- Choose which activities to push to the mobile app. Notifications for due dates always appear in the app.
- New content and discussions.
- New discussion responses.
- New grades and feedback.
- New and upcoming due dates.
- Click Save. A new drawer slides out from the right.
Adding a Cloud Storage Account
- Click on the Add account link in the Cloud Storage Accounts section. A new window will open.
- Choose a cloud storage service:
- Box (see directions below for connecting to UBbox).
- Dropbox.
- Google Drive.
- OneDrive
- OneDrive for Business.
- Box (see directions below for connecting to UBbox).
- Follow the on-screen prompts.
Connecting Your UBbox Account to UB Learns
- Click on the Add account link in the Cloud Storage Accounts section. A new window will open.
- Click Box.
- Click Use Single Sign On (SSO).
- Enter your UB email address.
- Click Authorize.
- Sign in with your UBITName and password.
- Click Grant access to Box.
Removing a Cloud Storage Account
- Click the trash can icon next to the cloud storage that you would like to remove.
- Click Delete.
Need additional help?
Use our contact form to submit a help ticket (you may be asked for your UBITName and password). After the form is submitted, a member of the UB Learns support team will follow up with you within one business day.